So if you’re like me, you probably squeed when Articulate announced that the latest update to Storyline 360 included REAL closed captioning!
But then you looked into things and sighed when you saw that you must already have the closed caption file (SRT, VTT, SBV, and SUB).
Many of us are instructional designers who are asked to created an eLearning activity that can be used in a K-12, higher ed, or business environment, and our resources are ones that we’re making from scratch. When this happens, there is no already-existing closed caption file. And if you’re blessed with resources like money (Adobe Premiere Pro) and time (the ability to upload videos to YouTube, caption them yourself, download them from YouTube, etc.), then that’s great. Most of us, though, don’t have such luxuries. 😉
However, there is hope!
All you need is your script, your Storyline 360 file that already contains audio (or your video that already includes voiceover), and a text editor…and you, too, can be an closed captionin’ captain (I was looking for a fun rhyme; this was all I came up with.)!
Important Note: Before you create your own closed caption (CC) file, it’s important to note how many audio or video files you have that need captions. For example, one video is one file; therefore, it only needs one CC file. But if you’ve got 15 little audio files that are sprinkled throughout a Storyline file, you’re going to need to create 15 little CC files.
Let’s get to business.
- Open up a text editor like notepad. You are going to want zero formatting capabilities in this file–plaintext only.
- Paste this starter text into your file:
1
00:00:00,500 --> 00:00:07,500
Welcome to my caption tutorial!

2
00:00:08,000 --> 00:00:10,500
Here are some closed captions.

3
00:00:12,500 --> 00:00:17,000
How do they look?
Those numbers above are timestamps. They indicate the precise moment when the text should appear on the screen. The format is:
HH:MM:SS,ms (milliseconds, which contain 3 digits)
00:00:00,500 –> 00:00:07,500 means that the text “Welcome to my caption tutorial!” will appear at 500 milliseconds and will stay visible until 7 seconds and 500 milliseconds.
- Now view/listen to your file that includes audio. Make note of generally when each sentence or short paragraph is read aloud and when that sentence ends (e.g., “Welcome to my caption tutorial” starts at 0 seconds and stops 7 seconds in.). These time estimates can start out general; we’ll tweak them later on.
- Once you’ve taken note of the timestamps, start putting the sentences into your plaintext file. Be sure that each timestamp includes three (3) parts:
- The number (indicates which sentence it is)
- The timestamps (when it appears and disappears)
- The audio text
- Since my sample file above only has three sentences, there are only 3 timestamps in the sample file.
- Continue adding all of the audio text in this format.
- When finished, click File > Save As…
- In your filename, add the extension .srt at the end.
- If your audio is English with no special characters, select ANSI.
- If your file is in another language that requires special characters, select UTF-8.

- Click Save.
- Once you’re finished, make sure your audio/video file has been added to a slide in Storyline 360.
- If it’s a video, click the video layer so the Video tab appears. If it’s audio, click the audio layer so the Audio tab appears.
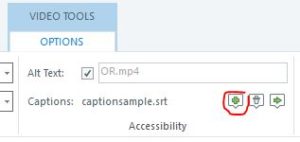
- Click the green + icon to link your .srt file to your audio/video.
- Once you’ve linked the file, you should see it listed after the word Captions:
- Preview your slide. You will need to click the CC button to see if the text is properly synced with your audio/video.

- Make changes to the timestamps in your .srt file as needed. If you make changes, be sure to lync the updated .srt file to your audio/video by clicking the green + icon in the Audio or Video tab.


Helpful tip: Listen to the audio on the active slide by clicking the audio layer (or view the video by hitting the spacebar). As you hear a sentence begin and end, press the C button on your keyboard to create some cue points, helping you determine the timestamps.
Download the Files (.story and two .srts)
*Note to readers: This is my first attempt at being active online again since having my daughter, Ava. I apologize if the many disruptions from a crying baby have caused this post to be all over the place 🙂

This post was so incredibly helpful! I had no desire to upload to YouTube, and then edit the poor quality translation. I just tried it out in Articulate Storyline 360 and it couldn’t have been easier to create! Thank you for the help! I’ll be sure to hit the “follow” button on your blog!
I’m glad you found this helpful. I was surprised that Articulate themselves didn’t come up with a tutorial like this for everyone at the beginning. It’s really easy to do!
Thank you, thank you, thank you! This was a lifesaver!
Glad to help! I just used this same tutorial yesterday at work :).
Hi! Thanks for the tutorial. I´m just looking into this as well and it looks like you might have found a great solution, however I´m working on a module that will have a ton of audio files so having to include the time stamp would prove to be very time consuming. If I´m captioning audio (no video) and need one srt per audio file, could the time stamp be left off? (I´m assuming the time stamp is just for video, but want to make sure…)
It can be for audio or video, but Articulate now has this feature built in! We just needed to wait a few years 🙂